
1Vision 1
2Objective 1
2.1Operating
System 2
2.1.1Burn SD
Card 3
2.1.2CONFIG.TXT 4
2.1.3First Boot
and OS Configurations 6
2.2SSH 8
2.3Apache 9
2.4ROS 10
2.5FTP 11
3Difficulties 12
3.1Password 12
3.2Desktop GUI 12
3.3Raspi-Config 12
4Conclusions 13
1Vision
Long term vision is to develop a UAV
veichole with AI controls.
To get there, the current milestone is
to build a robot that allows FPV control through a web browser, using
a small scale version of the tools that will be scaled up to allow
the vision to come to fruition.
As of now, I took care of mechanical,
electronical and firmware components. I now focus on the software
component and first order of businness is to take care of the OS, the
framework and the tools needed to develop the application.
2Objective
I need an operating system image for
the Raspberry Pi 3 SBC with the following features:
- Easiest possible linux based operating system
- GPIO - Communicate with my custom shield
- ROS - Framework commonly used in robotics
- Webserver - Allow local connection to the robot
2.1Operating System
Obvious choice is the Raspbian Operating System. Latest LTS release is the Raspbian Stretch that is a personalized version of the Debian Stretch that targets the Raspberry Pi 3. Previous version was the Raspbian Jessie.https://www.raspberrypi.org/downloads/raspbian/
I run in trouble trying to install ROS. Problem is the armhf extension. The easiest solution has been to get a OS image with ROS already configured.
https://medium.com/@rosbots/ready-to-use-image-raspbian-stretch-ros-opencv-324d6f8dcd96
Unfortunately this version only runs ROS Kinetic Kame, not the latest ROS Melodic Morenia, alas this is the best I could get with my current efforts.
This operating system does not have a desktop GUI, and installing one was not to be. It's ging to be harder to setup everything but there will be less wasted resources, so overall it might be a good thing.
2.1.1Burn SD Card
There are many tutorials to do this. Once it's done the SD card will have a FAT32 partition with the boot code and a linux partition with the operating system.Instructions:
- To ensure smooth operation delete existing partitions on the
SD Card. Leave the volume with no partition nor file system.
- Burn the image, usually in *.img format on the SD card. Do
not open “computer” during this process because windows might
mess up the writing process.

Using Read it's possible to save the image. I did it as soon as I configured most stuffs, as I'll probably need to roll back to an earlier version. I also verifiedthat cloning the card on a different Raspberry still works with no difference (other than the MAC adresses of course).
2.1.2CONFIG.TXT
Before plugging in the card in the raspberry pi, several options need to be changed in the file BOOT/CONFIG.TXTMake sure the HDMI port is enabled. With my VGA->HDMI adapter the Raspberry Pi would output to video composite by default otherwise
- hdmi_force_hotplug=1
Configure the GPIO so that in a magical moment during boot process the GPIO pins are correctly configured. GPIO4 is the reset of my Raspberry Pi Shield. This has a nice side effect that the shield is reset if something goes wrong with the Raspberry Pi
- gpio=4=op,dl
2.1.3First Boot and OS Configurations
First boot has to be done with Keyboard, Mouse and screen, because SSH is not enabled by default in the source image. Or at least I can't get it to work.Default username: “pi”
Default Password: “Rosbots!”
Command:
sudo raspi-config
this enter the configuration menu of the Raspbian OS. The Raspbian guys did an amazing job of neatly arranging all important configurations in one wizard.
- Change User Password: use an easier password. I set “xxx”.
- Network Options -> HostName: Set the name of the robot
“Maze Runner”
- Boot Options -> Console Autologin: Will boot logged to
user “pi”
- Localisation Option: Set the corret keyboard layout
- Interfacing Options -> SSH: Enable SSH connections. From
now on we can use PUTTY.
- Advanced Options -> Expand File System: Make sure the
image uses all the SD card. By default it uses only about 9GB and is
95% used.

apt-get autoremove
apt-get upgrade
apt-get update
Update the Raspbian to the latest version and remove garbage repositories.
sudo nano /etc/dhcpd.conf
uncomment static ip and gateway set ip and gateway. Otherwise you always have to discover IP before accessing with Putty or have to set a static rule on the router but it will go to waste each time you change Raspberry Pi since MAC address changes as well.
IP: 192.168.0.202
Gateway 192.168.0.1
Reboot
And check if all still works.
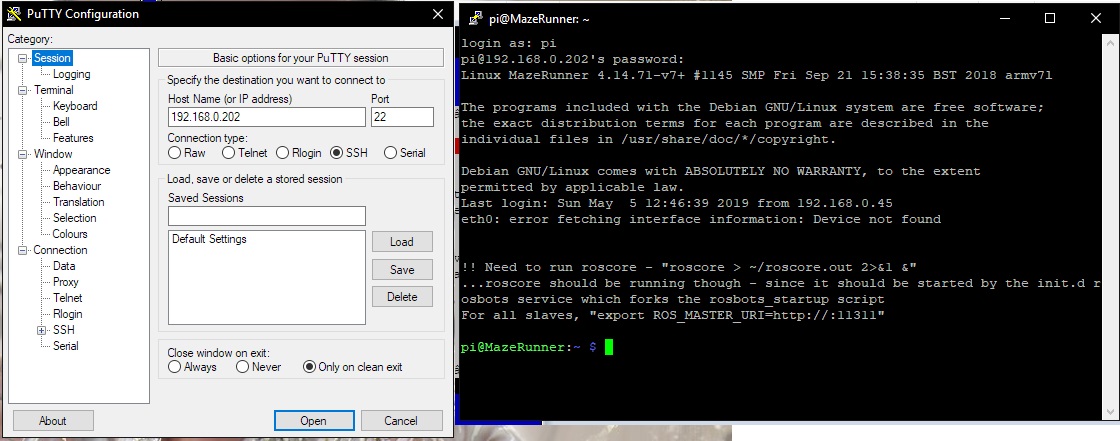
2.2SSH
SSH allows to access command line of the raspberry remotely.I use Putty with the following configurations:
IP: 192.168.0.202
Login with
User: “pi”
Pwd: “xxx”
I tested the same image on two cloed cards and two different raspberry pi, and it works headless after the initial configuration.
From here on you can disconnect screen keyboard and mouse, reboot and see if all still work.
2.3Apache
Apache was quite possibly the ONLY thing in LINUX whole history that worked out of the box.Punch in the command line:
sudo apt-get install apache2
That's it. If you go on a browser on a
computer on the local network on the page:
You'll see apache welcome page.
Everything is already up and running!
To edit the webpage:
sudo nano /var/www/html/index.html
This is the example page I built and
how it looks on a browser.

Code:
<!DOCTYPE html>
<html>
<body>
<video width="400" controls>
<source src="mov_bbb.mp4"
type="video/mp4">
<source src="mov_bbb.ogg"
type="video/ogg">
Your browser does not support HTML5 video.
</video>
<p>
Video courtesy of
<a href="https://www.bigbuckbunny.org/"
target="_blank">Big Buck Bunny</a>.
</p>
</body>
</html>
2.4ROS
Punch in the command:rospack find roscpp
And yu'll see it's doing something.
ROS is installed!
Developing a ROS application will be
the next step in the project.
2.5FTP
It would be useful to transfer file
directly from the developing computer to the Raspberry.
I use FileZilla and the FTP over SSH
protocol.
Because of permissions, Access is only
possible in write in the home folder.
I need to check if accessing by root
allow unrestricted write access.

Alternative would have been to install
a proper FTP server on the Raspberry Pi, but since SSH is enough
there is no need to waste resources.
3Difficulties
3.1Password
I couldn't remove user password once set, and it's set by default upon downloading the rosbot image. I followed the advice below and bricked the OS image.https://askubuntu.com/questions/281074/can-i-set-my-user-account-to-have-no-password
3.2Desktop GUI
I tried to install LightDM desktop GUI and bricked the OS Image.https://raspberrypi.stackexchange.com/questions/72218/raspbian-stretch-lite-lightdm-doesnt-run?rq=1
3.3Raspi-Config
SSID of wireless network does not seem to survive a reboot when set from here. I'm going to install an access point network inside the RPI3 anyway.4Conclusions
I was able to set up an operating
system on Raspberry alongside at least some of the tool needed to
build my ROS application.
Next step is to delve deeper in ROS.
No comments:
Post a Comment