1Abstract
My big 2019/2020 project, the Pi-Wars, was delayed due to Human Malware. With an additional year of development I decided to go back to the drawing board and expand the scope of the platform.
One of the aspects of OrangeBot I wish to improve is the motor controller. Shortcomings:
CPU: I hit the upper limit of the AT4809 8b 20MHz MCU running two 16b PID controller with two loops each at 2KHz, limiting the precision of the controls.
Current: No current loop in the PID controller. Adding one promises to optimize performance and efficiency
Auto-Tune: A PID auto-tuning algorithm based on light machine learning can optimize the precision of the PID. It can also compensate in runtime for changes in parameters to an extent (e.g. gearbox getting looser)
Screen: No screen on the motor board to quickly assess power, position and speed. Even error reporting relies on either a LED or the webserver. Clunky for debug
The decision was taken to upgrade to a new microcontroller.
1.1Why the Longan Nano GD32VF103
Given the additional time, I was in the mood to learn something new. Risc-V is gaining in traction, so I searched for a Risc-V based MCU. The 32b architecture already grant a 2X to 8X improvement to an 8b MCU for fixed point arithmetic, ensuring this would fix the lack of CPU power.
After some research, I found the Longan Nano. The performance are amazing for the price:
5$
32b 108 [MHz]
RV32IMAC+ECLIC
80x160 screen
In-circuit programmer
Reset+Button+RGB LED
Timer with quadrature decoder
The price to performance of the platform is AMAZING, and the feature set allows for everything I need to include in the motor controller.
One of four advanced timers allow to decode in hardware the encoder reading, without relying on costly ISR decoding, I have ADC channels for current reading, DMA, communication, and much more. Adding a screen for 5$ is incredible. They threw in a cheap plastic case for good measure and a couple of pin strips.
In the end I paid about 10€ per board considering import duty and delivery.
Illustration 1: Longan Nano
2Example
The Longan Nano comes in with a preloaded video player example. It requires an SD card with a video encoded as sequence of BMP images.
Video 1: Longan Video Demo
3Toolchain
With the physical boards arrived and tested, it was time to write and load code.
3.1VSCode + Platform.IO + Longan Nano Toolchain
The toolchain is well explained in this tutorial.
It requires GIT installed if you don't have it already.
Illustration 2: Platform.IO Installed
Unfortunately, that's the only thing explained well and I run into many problems making the toolchain work.
For the bootloader, you need drivers.
That's not all. In order for the board to show up, you need to:
Press the boot button (top button)
While boot is pressed, press and release the reset button
Release the boot button
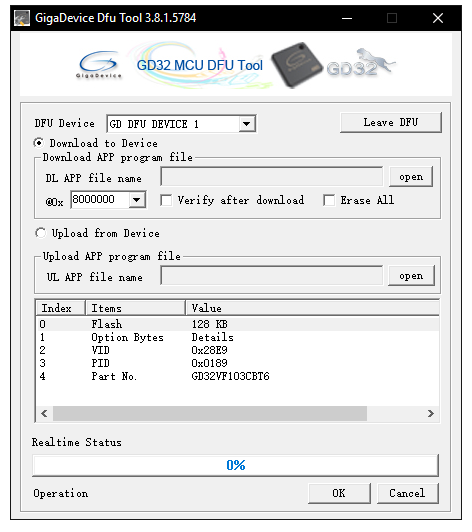
This makes the MCU enter programming mode, allowing it to show up on the Gigadevice GD32 MCU Tool. Always check verify. The firmware to be uploaded is the .hex stored in the .pio\build\sipeed-longan-nano subfolder of the project.
Illustration 3: DFU Firmware Upload tool
I was unable to make DFU tool work with the one click upload feature of VS Code, but its not a big deal to upload manually. It might be possible to use the serial port and a serial port adapter with a bootloader to use that feature, but I have yet to try, and USB-C is convenient apart from having to use the button combination to get the board in programming mode.
3.2New Project
With the toolchain in place, its time to start coding. On new project, you can select folder and framework. Use a custom project folder and Arduino framework.
Illustration 4: New Project
You have a choice of two framework. The GD32 framework doesn't work and I was unable to get to work. The Arduino framework can run the blink example. And nothing else. Even DigitalRead is not coded in the HAL Arduino library.
What does work is to use the Arduino framework write a main, and just use the functions in gd32vf103.h. From here you can pick my barebone example that should work with interrupts.
From now on, you can compile a project with VS Code and upload with DFU tool on the Longan Nano board.
4User Library
Like I did for other microcontrollers, I'm going to slowly build up upon the base HAL to have convenient driver and file structure for new projects.
I plan to use C++ classes whenever makes sense, and have a basic IO configuration init procedure and examples for how to do stuffs right. Lightweight screen drivers, initialize timers in various modes, hardwired scheduler, etc...
4.1Examples
Unfortunately the Longan Nano has few examples and bad documentation.
There are examples for other evaluation boards and GD32 MCUs to help draw the drivers of the various peripherals, but it takes work to adapt them and make them work.
Video 2: Longan Interrupt Example
4.2Interrupts
The interrupts were very hard to make work.
Here the solution from stack overflow.
The Risc-V has a very refined interrupt controller compared to the MCU I'm used to. The ECLIC is and extension and part of the Risc-V instruction set of the MCU. It provides special registers and instructions.
The ECLIC is interfaced with other controller like the EXTI to provide an extensive tiered interrupt support. There are also vectors to handle exceptions, watchdog, etc...
I feel it'll take time to master its use.
5Conclusions
The Longan Nano is a powerful 32b Risc-V MCU that fits the use case of the OrangeBot control board perfectly. Despite the clunkiness of the toolchain and lack of documentation, the cost and feature set provide great value and I consider it a great entry point to learn 32b MCUs and Risc-V.


